by Abdullah Jumaah, Dialog Semiconductor
The photovoltaic (PV) panels are special power supplies that deliver green and renewable power. PV panels have non-constant power based on many parameters (sun irradiation and angle, shadow percentage, temperature, and hotspot effect issue). The solar panel contains a matrix of solar cells that converts the sun irradiation to power. Connecting more cells in a matrix delivers more power but only 23 – 40% of the maximum power. The MPPTs (maximum power point trackers) are made to push the solar panel to work at the power curve’s maximum power point. The solar cells in the matrix are not equal, and the irradiation and sun angle is not equal over them. While using one MPPT per panel increases, the maximum power generated to 65% of the panel’s actual power can deliver. Using an MPPT per cell is expensive as it uses many components, and the board would be bigger than the cell itself.
This article illustrates how to solve the dilemma using a configurable mixed-signal integral circuit that can replace many components in the MPPT systems by a single IC with an inductor or an IC and a capacitor bank for the matrix. An appropriate IC can replace the MPPT controllers and sensors, but MOSFETs and the power inductor make up about 70% of the MPPT circuit. The circuit is suitable for almost all MPPT algorithms like perturb and observe, fuzzy control, etc.
Photovoltaic cell characteristics
Figure 1 below shows the VI and PI curves of a photovoltaic cell, indicating the curve’s maximum power point.

The system is an implementation of one of the MPPT algorithms to get the maximum power of a cell. Figure 2 shows the main connection of a big panel that contains a matrix of PV cells with one Boost converter and MPPT controller.

System block diagrams
Below, there is an illustration of creating a PV source that you can add to your system for renewable power charging. It needs fewer components to get the system working. An integrated circuit, two MOSFETs, and an inductor are used in this system instead of a big circuit to implement the MPPT algorithm.

Figure 3 shows the advantages of having an IC in the system. We can save space and design it faster than ever. The circuit can be attached to the PV cell to get a portable PV charger with full stability monitoring and protection features.
Figure 4 shows the MPPT implementation in free GreenPAK Designer Software (the complete design in the .gp format can be found here). The design keeps the system working at the PV cell’s maximum power point to a tolerance of 2.5 %.


Pins configuration is presented in Table 1:
How Does It Work?

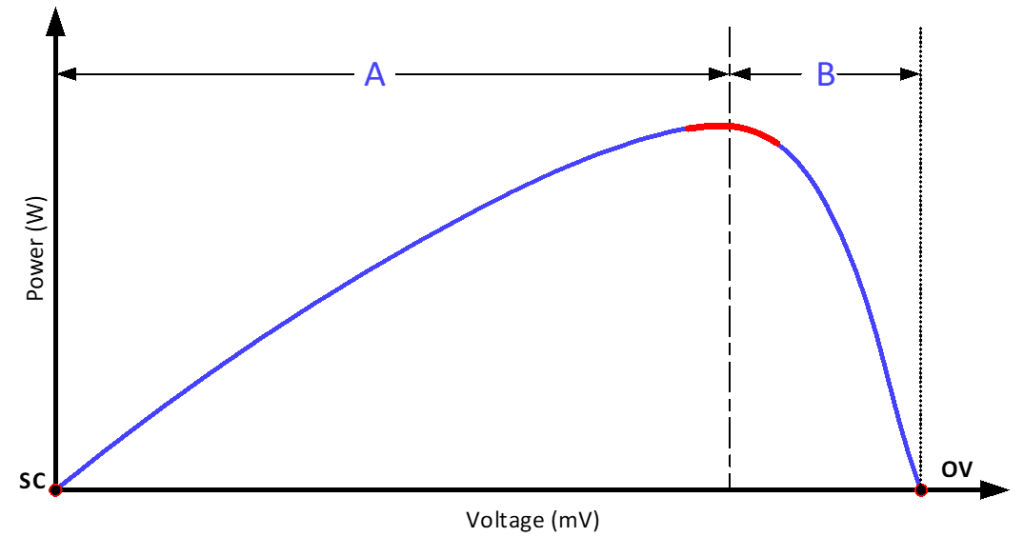
The circuit will be connected to a current sense resistor to determine the current difference and sensing the output voltage at the same time. To force the system to produce the maximum power, we push the operating point to the maximum power point by sensing the input current and voltage to determine if the system is at MPP or not. The system determines if the running voltage is below or higher than the MPP. We can divide the voltage-power curve into two regions, Region A on the left and region B on the right hand of the maximum power point, as shown in Figure 6. The circuit will determine if the voltage is in region A or B.
Sensing the current and voltage helps the system to update the duty cycle based on the ΔI and voltage value; this will help the MPPT to determine if the system at a region A or B (see Figure 6) then update the PWM value based on this decision to move the operating point toward the MPP. The MPPT starts from the open load point (V max @ no output current) then moves to the MPP and oscillates around it until changes happen in one of the parameters (sun Irradiation, shadow, and temperature). By changing the shadow, sun angle, TEMP, or sudden shadow, the cell will continue delivering the maximum power it can deliver without affecting the rest of the matrix’s cells.
To create a power plant, the user can easily attach the circuit to each cell to get the cell’s maximum power, but the output voltage is not a steady value as the main aim is maximum power. The user can use any DC-DC converter to get a suitable voltage for the system based on the application.
System blocks implementation
Implementation of the block diagram is shown in Figure 5. The application circuit used in this design is SLG46621.
PV Cell Current Sensing

Sensing the current is a good way to improve the system accuracy of updating the duty cycle and to have limitations not to hit the short circuit point.
PV cell voltage sensing

Sensing the voltage of the PV cell to let the system know if the duty cycle needs to be incremented or decremented to track the maximum power point. Sensing the voltage helps to know the direction of the duty cycle update, and sensing the current defines the increment/decrement value. Once it hits the maximum power, it continues updating the duty cycle in the same direction to perturb and observe if more power can be harvested from the PV. In steady-state, the system will keep oscillating around the maximum power point.
Duty cycle updater and stability study

The system determines if the running voltage is below or higher than the MPP. The IC will determine if the running voltage is in region A or B. The XNOR output goes high in region B and low in region A based on the voltage and the Duty cycle updater, which will increase or decrease the duty cycle accordingly.
The DC-DC converter requires enough time to settle down after the last duty cycle update, so the duty cycle updater must be slower than the switching frequency. Increasing the duty cycle updater frequency reduces the settling time for the system and causes instability. On the other hand, using a very slow duty cycle updater makes the system inefficient and requires a long time to track the maximum power. It’s important to get an optimum frequency that makes the system track the maximum power quickly without causing instability. The PV cells have slow variation in shadow and temperature conditions, as these two changes in the second’s range, which is significantly slower, so updating the duty cycle in the range of few milliseconds is enough to get a stable and fast tracker. Choose the switching frequency you want for this system as this will not affect the controller but make sure that SW frequency is suitable for your components. Using higher frequency allows you to use smaller components and increases the SW loss, so find the optimum frequency for the power module you use and make sure this frequency is higher than the duty cycle updater frequency.
Hardware Connection and Testing Results
PV Cell Emulator
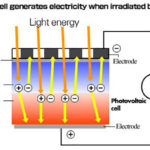
The photovoltaic cell is a diode that generates power once photons hit it and creates a voltage difference. To mimic the same behavior of a PV cell in your system for testing emulation, you simply substitute with the following:
- Current source (Chroma E Load can do this)
- Power diode.
- Two resistors.
The following figure shows how to connect the components to emulate a PV cell and shows the model’s output voltage that emulates the actual behavior of a PV cell and how the model works. See the voltage curve at the shown three points (a,b, and c). The VI curve at c simulates the exact behavior of a photovoltaic cell.

Validation tests

Start-up duty cycle increase
The circuit started from the OV point at voltage 550 mV at a small duty cycle; then, it increments the duty cycle that pushes the operating point toward the MPP. Once the system exceeds the MPP, it decrements the duty cycle back to track the MPP. In Figure 11, the system hovers around the MPP.
Testing the duty updater frequency

Figure 12 shows the signals at the duty cycle updater output. Channel 1 shows the data and channel 3 show the update/keep pin of the system.
Instability example
Instability is shown in the figure below while using a very fast duty cycle update, as shown in the system, updates the duty cycle very fast, and the voltage takes time to settle down at the OV point. Then the system realizes that it is region B, so it starts increasing the duty cycle very fast, but the voltage settles down at the SC point.

Power stage circuit
The IC will control a power Boost circuit to get the maximum power of the PV cell. The Boost converter has mainly been used to step up the input voltage to a stable output voltage, but in the MPPT, this is not the aim. The MPPT uses the Boost converter to act as an interface between the load and the PV by pushing the PV operating point to the maximum power point. In this circuit, we are controlling the input impedance to grab the maximum power. The figure below shows the implementation of the Boost converter. This circuit is not the perfect implementation for a Boost converter. The user can create a Boost converter or use one of the power trains in the market based on the selected PV cell power. High power applications require high current MOSFETs and larger inductors. In this case, the application might require a MOSFET driver as the IC PWM will not be able to drive a very large MOSFET gate load.

Figure 14 shows the start-up of the system. As mentioned before, it starts at the open circuit point, and the GP starts to generate the Duty cycle and increase it to push the operating point toward the maximum power point and settle down oscillating around it. In Figure 15 below, we used a slow Frequency of the updater with a resistive load parallel with 3x 47 µF as an output filter. Make sure to use a switching frequency higher than the duty update frequency, and make sure that you do not have any short to avoid thermal failures and redoing your work.

Conclusions
This article demonstrated the full system implementation of a maximum power point tracker using the “Perturb and Observe” topology. The MPPT will keep the photovoltaic cell working at a voltage that delivers the maximum power. Any designer can connect such a circuit to the system and realize the benefits of the solution. This implementation illustrated that such projects let us lower power consumption and, at the same time, have a relatively small device size.
References
“Predictive & Adaptive MPPT Perturb and Observe Method”, IEEE Transactions on Aerospace and Electronic Systems (Volume: 43, Issue: 3, July 2007)
“Optimization of perturb and observe maximum power point tracking method”, IEEE Transactions on Power Electronics (Volume: 20, Issue: 4, July 2005).


Leave a Reply